Lara summed up what went through her head before the start of this intensive training, “At the beginning I was skeptical – a training with only women? Can that go well? Not because I thought that we couldn’t do it technically or in terms of strength, but because the idea of only working with women was actually new to me. But the skepticism vanished immediately upon arrival. 12 women, of different characters, different backgrounds and yet all had a common denominator – the willingness to help whether at the Federal Agency for Technical Relief or for the fire department.”
The training got underway with a theory session to make sure everyone was up to speed with the required knowledge. There is, for example, a certain series of questions that needs to be posed at accident sites in order to identify whether vehicles involved may have alternative drive systems. Is there any leaking fuel? What does the underbody of the vehicle look like? Does it have a tank cap? Can anything be learned from the surface design of the car?
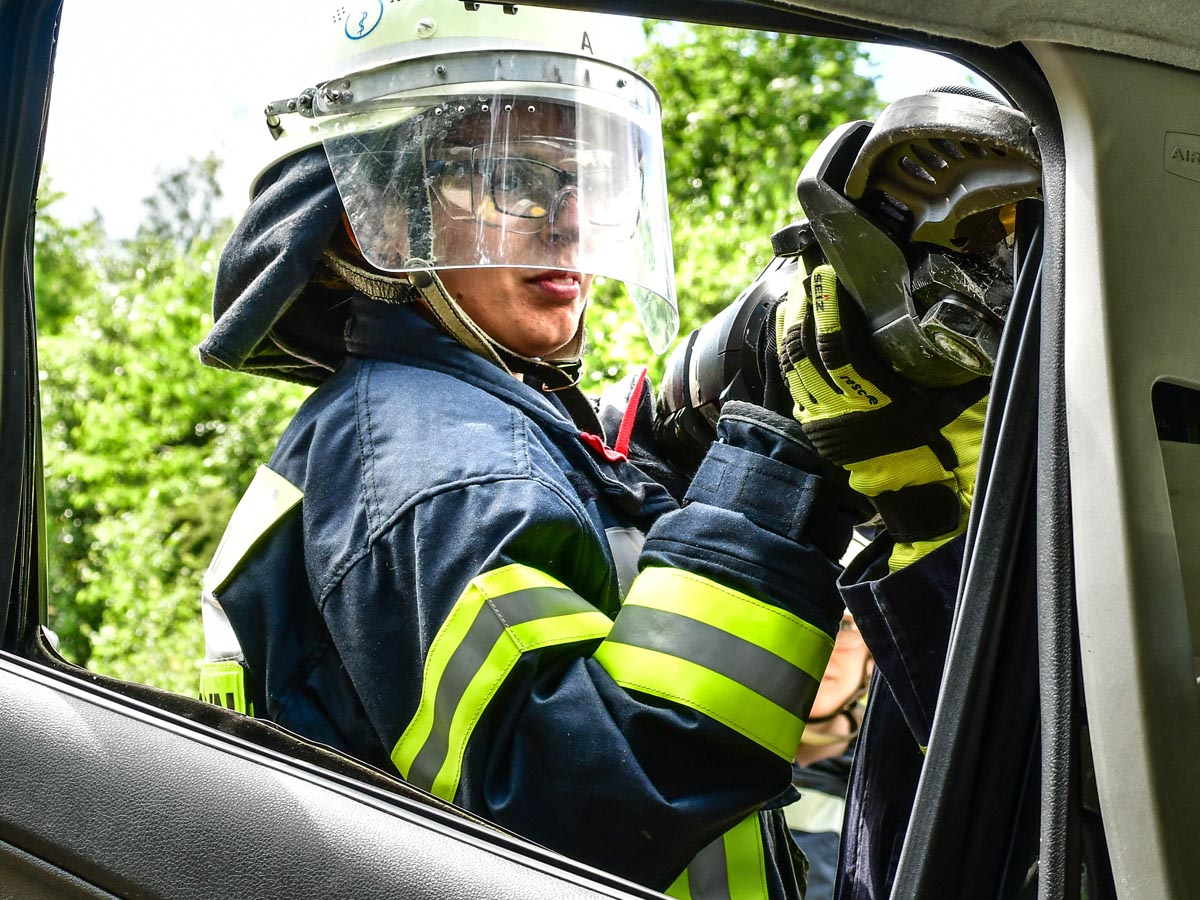
The trainers then go on to explain why every minute counts when rescuing people who are trapped in a vehicle after an accident and all the variables that are possible. The idea of getting victims out by taking the roof off a car or of making a large hole in the side is a familiar scenario, but most do not know about the “fish can” technique. This is where the roof and trunk of the car are cut with the rescue saw and spreader so the roof can only be folded forward to free the person quickly and gently.
Training continues in the afternoon, as participants were taken to a special “rescue training playground” to practice this technique. There is no shortage of accident vehicles that need to be dismantled, both hydraulic and battery operated. The work is done in two groups. One group begins with a side opening on a compact car. This is a chance for the women to try their hand at the “fish can.” After preparations are complete, one two, three – with all their might, the six women manage to fold down the roof at the end.
The second group consists of six group leaders. Each of them takes a turn in command, thinks about the best procedure to use given the situation, the individual steps needed, and assigns her colleagues a job. Their mission is to extricate a passenger from a car that had flipped onto the driver’s side. After the vehicle has been secured from tipping over, the female firefighters go to work. They saw out the windshield and roof so that the victim can be lifted sideways out of the vehicle using a transfer board. The crew moves onto another vehicle which has a large side opening. The women push the roof away with the help of rescue rams and the car becomes half a convertible. Teamwork is Everything
Jennifer, one of the section leaders, raves, “A really great experience! Of course, you never stop learning – even if it’s just little things. It is also nice when you can show others something and everyone benefits from the knowledge. I am also very amazed at how friendships developed among the participants. That may have been the best part of the experience!”
As the training drew to a close, the instructors were also delighted with the amount of professionalism on display, saying having a training group made up entirely of women created a different mood with more laughter and a natural team spirit. The group also came up with some different approaches to the tasks at hand. Obviously, it is hard for one woman alone to operate the heavy spreader and cutting equipment. But a colleague would often step in to lend a hand.
The final lesson was clear. We can do anything if we pull together! “There was certainly enough fun and laughter,” says Lara. “This was a fantastic group, and we have shown that women can get things done.” All the other “girls of HAIX” were full of enthusiasm about the day – an unbelievably great weekend.”
The following video shows some of the gear on a Fire Rescue Squad. The whole video is interesting but at the end they show a horse packaging slide. Animal Rescue is becoming a recognized part of the fire service. The Standard is to not use the same gear on people as you do on a large animal rescue so most Fire Departments are glad to have a resource that has gear designated to only Animal Rescue. Resources like the San Diego Humane Society – Technical Rescue Team, that carries all the same rope rescue gear as a Fire Rescue Squad, but is Animal Rescue specific are a valuable tool for the Fire Districts they serve.
Rip and blitz challenges: Use your cutter/spreader for car side removal extrication
Mar 4, 2020
You arrive on scene, and you’re confronted with a 2017 four-door sedan that has been T-boned by another vehicle. Victims are entrapped in both the front and rear seats, and you need full access to the damaged side. This would often result in a “rip and blitz” or a side removal technique in which we would start at the rear door and finish with both doors and the B post folding out and away from the vehicle on the front hinges.
You start your extrication and things aren’t going as planned. Unfortunately, you’re 15 minutes into it and you’ve been slowed down by the vehicle material not reacting the way you expected it to. What’s changed?
Modern vehicle technology keeps evolving and is always challenging extrication tools and techniques. We are always chasing the progress of the automotive industry and we can only hope to be prepared by constantly researching and learning. Reinforced or high-strength structural steel is not just improving in strength, but is also being added to more locations within vehicles.
Modern vehicle technology keeps evolving and is always challenging extrication tools and techniques. (Photo/Rescue Methods YouTube)
The structural system around the passengers and driver is basically becoming a high-strength steel roll cage. This includes vertical posts, roof rails, cross bars between the roof rails and posts, rockers and doors. Additionally, we are seeing hardened body steel and high-strength alloys or aluminums that are being used on body panels. To sum it up, we need to implement new strategies to cut through the high-strength steel and to help the tips of our tools to bite into the body material and not slip.
The following is a step-by-step progression through a rip and blitz with some tweaks or key points that we have found to be helpful on newer vehicles.
STEP 1: ACCESS THE REAR DOOR LATCH
Gain access to the rear door latch by spreading the rear door window. Place your hydraulic spreaders into the window opening and ensure that your upper tip captures the roof rail and not just the door rail. This will help immediately pull the inner door material away from the victim and create a purchase point for access to the latch.
I have found that this spread should be performed at about the midpoint of the door assembly. If this spread is too close to the latch or toward the rear of the door, the angle of spread is more significant and increases the likelihood of separating the outer door skin. The goal for this movement is to create space for the victim and produce an opening near the rear door latch without separating the door panels.
STEP 2: POP THE REAR DOOR LATCH
Place your spreaders into the gap that you have created near the latch. It is imperative that the spreader tips are placed against structural material on the inside of the door. On newer vehicles, if the tips contact the outer edge of the door panel, the door panel separates. This results in a loss of door strength and integrity, which reduces the structural resistance required to pop the latch. The end product will be sheared out door skin and or C post around the latch with a door that is still clinging on. The inner door panel is connected to the outer door skin with a bead of automotive adhesive that quickly separates under pressure.
Once the spreaders are properly placed, begin making progressive spreads to increase the gap between the C post and the inner door. To establish a good post and push point for your tips, try to keep the tips of the spreader perpendicular to the material they are placed against.
Some spreaders are being designed with aggressive tips that have hardened teeth on them. This style of tip provides a lot more versatility and forgiveness for the angle and placement of the tool.
Use slow movement at the inception of each spread to allow the tips time to seat or bite. This means we ease into the operating control. This also means that we do not have full power. Once the tips are seated and are not slipping, fully engage the operating control to achieve maximum power and speed, and spread the appropriate distance. The goal here is to pop the rear door latch. If the body steel around the latch begins to shear on either the C post or the door, be prepared to make one of two adjustments:
Reorient your spreader tips so that they run perpendicular across the shear line. For example, if the C post starts to shear out laterally across the top of the C post nader pin or U bolt, bring the base of the spreader straight up so that the spreader is pointed down and orient your tips vertically across the shear line. This can often stop the linear shear and give you the resistance you need to complete the movement.
If the gap you have created is sufficient to get a cutter into position and cut the latch, do so. Do not hesitate to switch to this application when the primary choice of spreading is proving inefficient.
STEP 3: MAKE A RELIEF CUT
Now that the rear door is popped, open the door and slip inside with your cutters to make a relief cut low on the back side of the B post. This relief cut should be below the lower hinge and above the rocker. It should also be made as close to the rocker as possible to avoid cutting the seatbelt pre-tensioner.
As with all cuts, ensure that the cosmetics have been removed from the inside of the post so that you can identify any SRS and ABS components. Ideally, the cut does not extend down into the rocker. This usually results in shearing out the rocker, which is a somewhat undesired result.
On newer vehicles, the seatbelt pre-tensioner at the bottom of the B post often has a very strong mounting bracket that is inside of the post. It is located at the midline of the post and many hydraulic cutters cannot pierce cut the bracket. If you are attempting this cut and your cutter begins to rotate, use extreme caution. Your blades may be separating and will eventually fracture. This cut does not have to be extremely deep, so you have two options at this point.
Pull back on your cutter and make a shallower cut. This will require a more surgical approach when it is time to shear the B post with your spreader. However, it will save your cutter blades.
Attempt to advance the cutter and make a deeper cut. With each squeeze of the cutter you are compressing the material and ultimately making it thinner. If you need to advance the cutter and get deeper, after the initial squeeze, simply open the cutters up and attempt to move deeper. This may bring the tips of your blades past the pre-tensioner bracket and allow a fuller relief cut to be made.
STEP 4: BEGIN TO SPREAD
Now remove your cutter, cut the seat belt, and insert your spreader. On older cars, we used to place our spreaders into the relief cut we had made and spread vertically. The rockers were very substantial and the B posts were weaker. This provided the right mixture to easily shear out the base of the B post.
On newer vehicles, this movement is often ineffective. We have found a lot more success in spreading more laterally and utilizing the rear door as a push point. To do this, orient your spreader so that it is flat and parallel with the ground. Place the inside tip against the rocker just below the relief cut. The inside tip should follow the same line as the relief cut. This will facilitate the relief cut continuing its linear path through the B post without veering down into the rocker.
The outer tip of the spreader should be against the inner portion of the rear door. This often requires the spreader to be twisted slightly so that the outer tip is spread at a slightly upward angle. Begin the spread. While spreading, you are carefully observing the lower hinge between the rear door and the B post. You are spreading the door and relying on the hinge to carry out the B post and shear it. If the lower hinge begins to separate from the B post or the door, you will have to respond with the following:
In the process of spreading the rear door, you will have offset the B post where the relief cut was made. That offset provides a new purchase point to place the spreaders into and shear the B post.
Continue to think laterally and not vertically. Place the tips at about a 45-degree angle directly into the relief cut and drive the top of the B post out.
As this spreading movement is made, continue to watch your relief cut grow or shear and avoid allowing the shear to go downward into the rocker. Changing the tip placement and the angle of spread will alter the shear line.
STEP 5: CUT THE B POST
Once the B post shears, it will typically pop. You now know the tension is off of the B post. You are now ready to cut the top of the B post. You will notice that we have saved this movement for last. Many practitioners cut the top of the B post early in this evolution. If you cut it early, it becomes an uncontrolled segment and while you are attempting to shear out the bottom of the B post, the top typically swings into the victim sitting in the front seat.
To avoid that, we save this cut for the end. The rear door will be significantly displaced at this point and the cutter can typically be brought in the rear door gap at the top of the B post. Make the cut. Once the cut is complete, simply swing both doors and the B post out and away from the vehicle. The front hinges on the front door are now carrying the weight of the entire side of the vehicle. Ensure that hydraulic hoses, hands and feet, etc., are protected and not positioned under the doors.
Articles like this are a great opportunity to learn from the rescue community. If you have any additional tricks or techniques that you have found success with on newer vehicles, please share them. Firefighters helping firefighters. Wed love to hear about them. Stay safe and train hard!
This article, originally published in 2017, has been updated.
About the author
Dalan Zartman is a technical-rescue curriculum subject-matter expert for the Ohio Emergency Management Agency and Department of Homeland Security. He has also taught more than 100 technical-rescue courses at Bowling Green State University, where he serves as regional training program director and advisory board member. Zartman is a member of and instructor for the Central Ohio Strike Team and the Washington Township Fire Department. He is a certified rescue instructor, rescue technician level II, fire instructor II, firefighter and EMT. Zartman is founder and president of Rescue Methods. Connect with Zartman via email.